This article will teach you how to write your very own Slack chatbot that answers simple questions using some basic machine learning tools. Most of the more complex stuff around natural language processing and math behind creating machine learning models is mostly abstracted out, leaving room for us to easily build a finished product in a pretty short amount of time. If you're looking for a simple and effective way to get a semi-intelligent bot answering questions on Slack fast, then this guide is the one for you.
If you want to skip to the finished code, check out the link to the Github repo here or at the end of the post.
Edit 10/27/19
Because the library I used (Botkit) had a few critical security vulnerabilities and I couldn't get the latest version of the library working, I switched over to the Slack RTM API. The below code examples should work just fine, but if you're interested in using the latest version of the code, check out the example repo at the bottom. Link to Pull Request with all code changes.
Some Setup
This guide assumes you have basic knowledge about Node development, as this will be the main tool we will be using to build with. You're also going to need the following installed and working on your machine. I'm usually most productive in a unix-like terminal environment, aka bash. Here's what else you will need:
- An installation of NodeJS with the npm package manager. I used Node v10.1.0 with npm v6.1.0 when writing this, but any relatively recent version should work (like v6 and up).
- A Slack workspace that you have administrative rights in. If you can't find one, just make a new one. This is the playground where we will be developing and testing out bots capabilities.
- A code editor. I'm a big fan of VS Code.
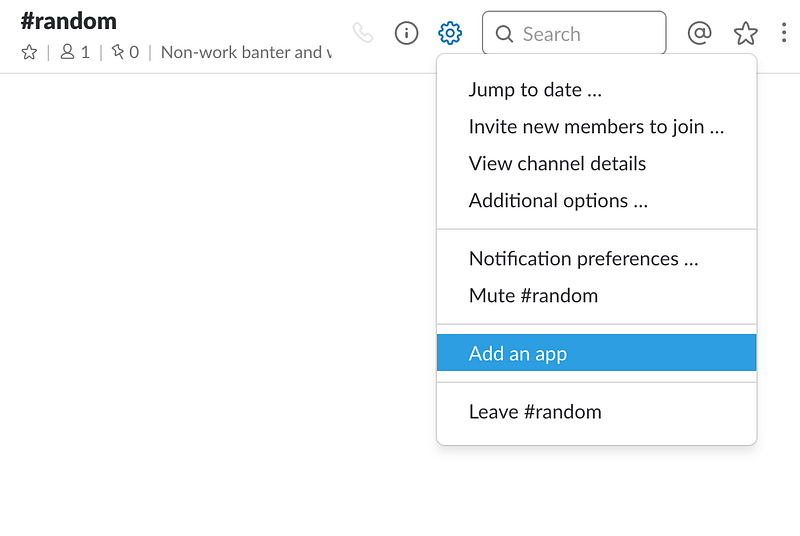
Once you have your Slack workspace open, go to any channel and click on the settings gear icon. We're going to add an app to our workspace.
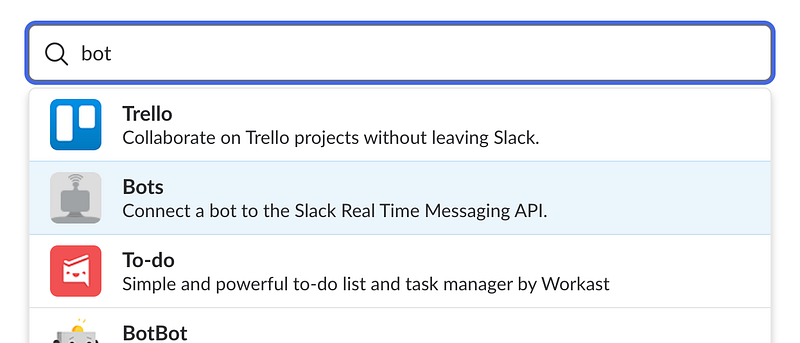
Search for bot and add the Bots integration.
Add the configuration and give it a name you like. This will basically create a special type of user in your workspace you can send messages to, just like any other user. You can change the name and icon of the bot later, but what we need now is the API Token value that get's generated. BE SURE TO KEEP THIS VALUE SECRET. If someone gets access to this, they get free access to read and post messages in your workspace.

Keep that value handy. We're going to use it soon as we start writing some code.
Time to Code
Basic bot setup
To get something set up, let's start by getting some boilerplate code out of the way. The following npm commands should get the basics set up.
# Starting in the directory where your code is going
npm init -f
npm i --save natural [email protected] dotenv
Notice the three libraries we will be using.
- natural: Provides basic text processing and classification functions
- botkit: A wrapper around the Slack API to easily write programs with integration with Slack
- dotenv: Let's us manage environment variables in a file for local development and testing
From there we can start writing some code. Let's start by making sure we can connect to Slack using the API token we set up previously. Create a file named .env and paste in the following contents replacing the part after the = with your API token.
SLACK_API_TOKEN=
If you are using something like git to maintain your code changes, make sure to add .env to your .gitignore file so you don't accidentally push it somewhere others can see it!
Next let's get to the real code. We're going to start with some simple setup to make sure we can connect to our Slack workspace using the API token and with some help from the botkit library. We can start with the an index.js file like this:
const botkit = require('botkit')

// Load our environment variables from the .env file
require('dotenv').config();

// What are the types of chats we want to consider
// In this case, we only care about chats that come directly to the bot
const scopes = [
    'direct_mention',
    'direct_message',
    'mention'
];

// Get our Slack API token from the environment
const token = process.env.SLACK_API_TOKEN;

// Create a chatbot instance using Botkit
const Bot = BotKit.slackbot({
    debug: true,
    storage: undefined
});

// Function to handle an incoming message
// In this example function the bot will just reply with "got it"
function handleMessage(speech, message) {
    console.log(speech, message);
    speech.reply(message, "got it");
}

// Configure the bot
// .* means match any message test
// The scopes we pass determine which kinds of messages we consider (in this case only direct message or mentions)
// handleMessage is the function that will run when the bot matches a message based on the text and scope criteria
Bot.hears('.*', scopes, handleMessage);

// Instantiate a chatbot using the previously defined template and API
// Open a connection to Slack's real time API to start messaging
Bot.spawn({
    token: token
}).startRTM();
The code above should be simple enough to get your bot up and running. You just need to execute node index.js, and your bot should connect to the Slack API and show up as "Active" in your workspace. If you send it a message, it should reply back with "got it". You could also modify the code to have the bot respond with whatever you like.

Adding some machine learning
Now that we have the basic setup done, we can start to add some intelligence to our bot. Since we're aiming to have our bot answer questions, we need to take a bit of an open ended approach. Not everyone asks questions the same way. So we need a way to match different questions or phrases coming in with what topic they're associated with, and then give the appropriate answer.
Like I might ask: "What time is it?" while you might ask the same thing by typing "Give me the current time." Both phrases could be matched to the topic of "current-time," so we can't just use strict equality in our code. We are going to employ some machine learning to do this fuzzy matching.
The first thing we need for this is a training data set with a pre-populated set of phrases, associated labels, and appropriate responses or answers. The training data format will be JSON that outlines some phrases and keywords that represent a type of question and a single answer that the bot should respond with when it sees a question like those phrases or keywords. For example, here's a training data set with only two topics, each with a set of possible phrases, and an appropriate response:
{
    "self": {
        "questions": [
            "introduce yourself",
            "sup",
            "hi",
            "hello"
        ],
        "answer": "Hello! I'm a chatbot tasked with answering your questions! `Beep, Boop` :robot_face:"
    },
    "world": {
        "questions": [
            "what is the world",
            "answer to the universe and everything"
        ],
        "answer": "42"
    }
}
Put this in a file called trainingData.json in the root of your project.
Each group of questions and answer has a label. This is how our bot will try to classify all the input it receives and figure out how to respond.
Now let's add some code to consume the data and train a classifier we can later use to intelligently match and respond to questions. We can create a simple function to read our trainingData.json file and convert it into a JavaScript object we can read from.
/**
 * Function to easily parse a given json file to a JavaScript Object
 *
 * @param {String} filePath
 * @returns {Object} Object parsed from json file provided
 */
function parseTrainingData(filePath) {
    const trainingFile = fs.readFileSync(filePath);
    return JSON.parse(trainingFile);
}
Then we can load our training data using the function like so.
// Load our training data
const trainingData = parseTrainingData('./trainingData.json');
Next up is creating what's called a classifier to consume our training data and create a machine learning model to later make decisions to incoming questions based on what it has learned. Basically, given the set of phrases and responses we provide, the model should be able to extrapolate what response to provide to a phrase it sees as similar to one it has seen before. If you want to learn more about what exactly a classifier is in the context of machine learning, check this out.
We're going to use a library for this. So start by importing the natural library we installed earlier and create a new LogisticRegressionClassifier at the top of you file.
const NLP = require('natural');
// Create a new classifier to train
const classifier = new NLP.LogisticRegressionClassifier();
Next we need a function for the classifier to be able to ingest training examples. In this case: what questions (phrases) match up to a given answer type (label).
/**
 * Will add the phrases to the provided classifier under the given label.
 *
 * @param {Object} classifier
 * @param {String} label
 * @param {Array.String} phrases
 */
function trainClassifier(classifier, label, phrases) {
    console.log('Teaching set', label, phrases);
    phrases.forEach((phrase) => {
        console.log(`Teaching single ${label}: ${phrase}`);
        classifier.addDocument(phrase.toLowerCase(), label);
    });
}
Now that we have a way for our bot to learn some examples of phrases it might see and classify them appropriately, we need a way for it to handle sending back a proper reply.
Since our training data includes an answer for a set of example phrases under a label, we can use it to have the bot send back the same reply. So if our chatbot sees an incoming message that looks like "sup", based on our training data, it should classify it with the label "self" and send back the answer associated with that label: "Hello! I'm a chatbot tasked with answering your questions! Beep, Boop :robot_face:". Look back at trainingData.json if you need to see that example again.
One thing it considers is the fact that our classifier's guesses will usually not be perfect. Each guess will have a different confidence value associated with it corresponding to how confident the classifier is to matching a label to the phrase provided. As a result, we need to put in some logic to only give a response if the classifier is pretty certain it has the right guess of how to label the input phrase. If not, we basically respond with "¯_(ツ)_/¯ don't know what you're talking about. I'm not trained to respond to that."
That's a lot of explaining, let's see what our function to interpret incoming text looks like.
/**
 * Uses the trained classifier to give a prediction of what
 * labels the provided pharse belongs to with a confidence
 * value associated with each and a a guess of what the actual
 * label should be based on the minConfidence threshold.
 *
 * @param {String} phrase
 *
 * @returns {Object}
 */
function interpret(phrase) {
    console.log('interpret', phrase);
    const guesses = classifier.getClassifications(phrase.toLowerCase());
    console.log('guesses', guesses);
    const guess = guesses.reduce((x, y) => x && x.value > y.value ? x : y);
    return {
        probabilities: guesses,
        guess: guess.value > (0.7) ? guess.label : null
    };
}
Notice where we check if guess.value > 0.7. What this says is that if our classifier does not match a label with a confidence of at least 70%, then we say we didn't find a match. Whatever message came in didn't match anything we trained our classifier to respond to, so we return null and our ¯_(ツ)_/¯ response.
This is like if someone asked you "What time is it?" you know exactly how to respond because you learned what that question means and how to get the answer. If someone game up and said "Blargen Flostel Bhigba" chances are you never learned how to respond to that, so you'll probably throw up a ¯_(ツ)_/¯.
So now we need a function to match up that label with the answer that corresponds to that label. Let's modify our handleMessage function to do this. Instead of sending back the same reply to everything, let's interpret what the message was, then use the label our classifier generates to provide the appropriate answer based on our training data. If our attempt to interpret the message didn't yield a result, the bot can simply reply that it didn't understand.
/**
 * Callback function for BotKit to call. Provided are the speech
 * object to reply and the message that was provided as input.
 * Function will take the input message, attempt to label it
 * using the trained classifier, and return the corresponding
 * answer from the training data set. If no label can be matched
 * with the set confidence interval, it will respond back saying
 * the message was not able to be understood.
 *
 * @param {Object} speech
 * @param {Object} message
 */
function handleMessage(speech, message) {
    const interpretation = interpret(message.text);
    console.log('InternChatBot heard: ', message.text);
    console.log('InternChatBot interpretation: ', interpretation);

    if (interpretation.guess && trainingData[interpretation.guess]) {
        console.log('Found response');
        speech.reply(message, trainingData[interpretation.guess].answer);
    } else {
        console.log('Couldn\'t match phrase')
        speech.reply(message, 'Sorry, I\'m not sure what you mean');
    }
}
Last up, let's bring it all together by calling all the functions we just created and the existing ones we have to get our bot up and running. Notice the code at the bottom is basically the same, except we've modified the handleMessage function to be a bit smarter this time around.
// For each of the labels in our training data,
// train and generate the classifier
var i = 0;
Object.keys(trainingData).forEach((element, key) => {
    trainClassifier(classifier, element, trainingData[element].questions);
    i++;
    if (i === Object.keys(trainingData).length) {
        classifier.train();
        const filePath = './classifier.json';
        classifier.save(filePath, (err, classifier) => {
            if (err) {
                console.error(err);
            }
            console.log('Created a Classifier file in ', filePath);
        });
    }
});

// Configure the bot
// .* means match any message test
// The scopes we pass determine which kinds of messages we consider (in this case only direct message or mentions)
// handleMessage is the function that will run when the bot matches a message based on the text and scope criteria
Bot.hears('.*', scopes, handleMessage);

// Instantiate a chatbot using the previously defined template and API token
// Open a connection to Slack's real time API to start messaging
Bot.spawn({
    token: token
}).startRTM();
Taking it for a spin
Let's see what our bot can do! Go ahead and run node index.js in your console in the root of your project directory. If all goes to plan, you should see your bot injecting your training data examples and start up waiting for input.
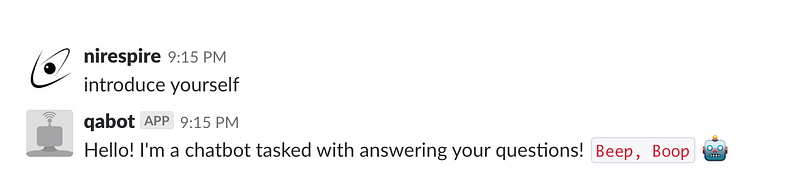
Head back to Slack and try to ask it to introduce itself!
Ask it something else you trained it to respond to!

If you ask it something it hasn't been trained for, expect an appropriate response.

But you could always train the bot to respond to that by adding it to your training data! Just create a new label and add some questions and an answer you'd like the bot to respond with.
Conclusion
I was going to write some extra stuff about how to deploy the bot somewhere and potential ideas for enhancements, but this post has already become longer than I anticipated. I plan to get those thoughts into a follow up post and link it here. In the meanwhile, please comment with your feedback. Was following along easy enough? What skill level are you at with Node development or ML concepts? Also don't forget to share the cool bots you create!
Other resources
Complete code example available here: Nirespire/FAQBot
Udacity Intro to Machine Learning: intro-to-machine-learning--ud120
---
title: "How to Make a Q&A Chatbot With Machine Learning"
date: 2018-07-11
tags: ["machine learning", "chatbot", "slack", "javascript", "nodejs", "natural language processing", "ai"]
---
This article will teach you how to write your very own Slack chatbot that answers simple questions using some basic machine learning tools. Most of the more complex stuff around natural language processing and math behind creating machine learning models is mostly abstracted out, leaving room for us to easily build a finished product in a pretty short amount of time. If you're looking for a simple and effective way to get a semi-intelligent bot answering questions on Slack fast, then this guide is the one for you.
If you want to skip to the finished code, check out the link to the Github repo [here](https://github.com/Nirespire/FAQBot) or at the end of the post.
> Edit 10/27/19
> Because the library I used (Botkit) had a few critical security vulnerabilities and I couldn't get the latest version of the library working, I switched over to the [Slack RTM API](https://slack.dev/node-slack-sdk/rtm-api). The below code examples should work just fine, but if you're interested in using the latest version of the code, check out the example repo at the bottom. [Link to Pull Request with all code changes](https://github.com/Nirespire/FAQBot/pull/2).
### Some Setup
This guide assumes you have basic knowledge about Node development, as this will be the main tool we will be using to build with. You're also going to need the following installed and working on your machine. I'm usually most productive in a unix-like terminal environment, aka bash. Here's what else you will need:
1. An installation of NodeJS with the npm package manager. I used Node v10.1.0 with npm v6.1.0 when writing this, but any relatively recent version should work (like v6 and up).
2. A Slack workspace that you have administrative rights in. If you can't find one, just [make a new one](https://slack.com/get-started#create). This is the playground where we will be developing and testing out bots capabilities.
3. A code editor. I'm a big fan of [VS Code](https://code.visualstudio.com/).
Once you have your Slack workspace open, go to any channel and click on the settings gear icon. We're going to add an app to our workspace.

Search for bot and add the Bots integration.

Add the configuration and give it a name you like. This will basically create a special type of user in your workspace you can send messages to, just like any other user. You can change the name and icon of the bot later, but what we need now is the **API Token** value that get's generated. ***BE SURE TO KEEP THIS VALUE SECRET***. If someone gets access to this, they get free access to read and post messages in your workspace.

Keep that value handy. We're going to use it soon as we start writing some code.
### Time to Code
#### Basic bot setup
To get something set up, let's start by getting some boilerplate code out of the way. The following npm commands should get the basics set up.
```bash
# Starting in the directory where your code is going
npm init -f
npm i --save natural
[email protected] dotenv
```
Notice the three libraries we will be using.
* [natural](https://github.com/NaturalNode/natural): Provides basic text processing and classification functions
* [botkit](https://github.com/howdyai/botkit): A wrapper around the Slack API to easily write programs with integration with Slack
* [dotenv](https://github.com/motdotla/dotenv): Let's us manage environment variables in a file for local development and testing
From there we can start writing some code. Let's start by making sure we can connect to Slack using the API token we set up previously. Create a file named `.env` and paste in the following contents replacing the part after the `=` with your API token.
```
SLACK_API_TOKEN=
```
> If you are using something like git to maintain your code changes, make sure to add `.env` to your `.gitignore` file so you don't accidentally push it somewhere others can see it!
Next let's get to the real code. We're going to start with some simple setup to make sure we can connect to our Slack workspace using the API token and with some help from the botkit library. We can start with the an `index.js` file like this:
```javascript
const botkit = require('botkit')
// Load our environment variables from the .env file
require('dotenv').config();
// What are the types of chats we want to consider
// In this case, we only care about chats that come directly to the bot
const scopes = [
'direct_mention',
'direct_message',
'mention'
];
// Get our Slack API token from the environment
const token = process.env.SLACK_API_TOKEN;
// Create a chatbot instance using Botkit
const Bot = BotKit.slackbot({
debug: true,
storage: undefined
});
// Function to handle an incoming message
// In this example function the bot will just reply with "got it"
function handleMessage(speech, message) {
console.log(speech, message);
speech.reply(message, "got it");
}
// Configure the bot
// .* means match any message test
// The scopes we pass determine which kinds of messages we consider (in this case only direct message or mentions)
// handleMessage is the function that will run when the bot matches a message based on the text and scope criteria
Bot.hears('.*', scopes, handleMessage);
// Instantiate a chatbot using the previously defined template and API
// Open a connection to Slack's real time API to start messaging
Bot.spawn({
token: token
}).startRTM();
```
The code above should be simple enough to get your bot up and running. You just need to execute `node index.js`, and your bot should connect to the Slack API and show up as "Active" in your workspace. If you send it a message, it should reply back with "got it". You could also modify the code to have the bot respond with whatever you like.

#### Adding some machine learning
Now that we have the basic setup done, we can start to add some intelligence to our bot. Since we're aiming to have our bot answer questions, we need to take a bit of an open ended approach. Not everyone asks questions the same way. So we need a way to match different questions or phrases coming in with what topic they're associated with, and then give the appropriate answer.
Like I might ask: "What time is it?" while you might ask the same thing by typing "Give me the current time." Both phrases could be matched to the topic of "current-time," so we can't just use strict equality in our code. We are going to employ some machine learning to do this fuzzy matching.
The first thing we need for this is a training data set with a pre-populated set of phrases, associated labels, and appropriate responses or answers. The training data format will be JSON that outlines some phrases and keywords that represent a type of question and a single answer that the bot should respond with when it sees a question like those phrases or keywords. For example, here's a training data set with only two topics, each with a set of possible phrases, and an appropriate response:
```json
{
"self": {
"questions": [
"introduce yourself",
"sup",
"hi",
"hello"
],
"answer": "Hello! I'm a chatbot tasked with answering your questions! `Beep, Boop` :robot_face:"
},
"world": {
"questions": [
"what is the world",
"answer to the universe and everything"
],
"answer": "42"
}
}
```
Put this in a file called `trainingData.json` in the root of your project.
Each group of questions and answer has a label. This is how our bot will try to classify all the input it receives and figure out how to respond.
Now let's add some code to consume the data and train a classifier we can later use to intelligently match and respond to questions. We can create a simple function to read our `trainingData.json` file and convert it into a JavaScript object we can read from.
```javascript
/**
* Function to easily parse a given json file to a JavaScript Object
*
* @param {String} filePath
* @returns {Object} Object parsed from json file provided
*/
function parseTrainingData(filePath) {
const trainingFile = fs.readFileSync(filePath);
return JSON.parse(trainingFile);
}
```
Then we can load our training data using the function like so.
```javascript
// Load our training data
const trainingData = parseTrainingData('./trainingData.json');
```
Next up is creating what's called a classifier to consume our training data and create a machine learning model to later make decisions to incoming questions based on what it has learned. Basically, given the set of phrases and responses we provide, the model should be able to extrapolate what response to provide to a phrase it sees as similar to one it has seen before. If you want to learn more about what exactly a classifier is in the context of machine learning, [check this out](https://www.udacity.com/course/intro-to-machine-learning--ud120).
We're going to use a library for this. So start by importing the `natural` library we installed earlier and create a new `LogisticRegressionClassifier` at the top of you file.
```javascript
const NLP = require('natural');
// Create a new classifier to train
const classifier = new NLP.LogisticRegressionClassifier();
```
Next we need a function for the classifier to be able to ingest training examples. In this case: what questions (phrases) match up to a given answer type (label).
```javascript
/**
* Will add the phrases to the provided classifier under the given label.
*
* @param {Object} classifier
* @param {String} label
* @param {Array.String} phrases
*/
function trainClassifier(classifier, label, phrases) {
console.log('Teaching set', label, phrases);
phrases.forEach((phrase) => {
console.log(`Teaching single ${label}: ${phrase}`);
classifier.addDocument(phrase.toLowerCase(), label);
});
}
```
Now that we have a way for our bot to learn some examples of phrases it might see and classify them appropriately, we need a way for it to handle sending back a proper reply.
Since our training data includes an answer for a set of example phrases under a label, we can use it to have the bot send back the same reply. So if our chatbot sees an incoming message that looks like "sup", based on our training data, it should classify it with the label "self" and send back the answer associated with that label: "Hello! I'm a chatbot tasked with answering your questions! `Beep, Boop` :robot_face:". Look back at `trainingData.json` if you need to see that example again.
One thing it considers is the fact that our classifier's guesses will usually not be perfect. Each guess will have a different confidence value associated with it corresponding to how confident the classifier is to matching a label to the phrase provided. As a result, we need to put in some logic to only give a response if the classifier is pretty certain it has the right guess of how to label the input phrase. If not, we basically respond with "¯\_(ツ)_/¯ don't know what you're talking about. I'm not trained to respond to that."
That's a lot of explaining, let's see what our function to interpret incoming text looks like.
```javascript
/**
* Uses the trained classifier to give a prediction of what
* labels the provided pharse belongs to with a confidence
* value associated with each and a a guess of what the actual
* label should be based on the minConfidence threshold.
*
* @param {String} phrase
*
* @returns {Object}
*/
function interpret(phrase) {
console.log('interpret', phrase);
const guesses = classifier.getClassifications(phrase.toLowerCase());
console.log('guesses', guesses);
const guess = guesses.reduce((x, y) => x && x.value > y.value ? x : y);
return {
probabilities: guesses,
guess: guess.value > (0.7) ? guess.label : null
};
}
```
Notice where we check if `guess.value > 0.7`. What this says is that if our classifier does not match a label with a confidence of at least 70%, then we say we didn't find a match. Whatever message came in didn't match anything we trained our classifier to respond to, so we return `null` and our ¯\_(ツ)_/¯ response.
This is like if someone asked you "What time is it?" you know exactly how to respond because you learned what that question means and how to get the answer. If someone game up and said "Blargen Flostel Bhigba" chances are you never learned how to respond to that, so you'll probably throw up a ¯\_(ツ)_/¯.
So now we need a function to match up that label with the answer that corresponds to that label. Let's modify our `handleMessage` function to do this. Instead of sending back the same reply to everything, let's `interpret` what the message was, then use the label our classifier generates to provide the appropriate answer based on our training data. If our attempt to interpret the message didn't yield a result, the bot can simply reply that it didn't understand.
```javascript
/**
* Callback function for BotKit to call. Provided are the speech
* object to reply and the message that was provided as input.
* Function will take the input message, attempt to label it
* using the trained classifier, and return the corresponding
* answer from the training data set. If no label can be matched
* with the set confidence interval, it will respond back saying
* the message was not able to be understood.
*
* @param {Object} speech
* @param {Object} message
*/
function handleMessage(speech, message) {
const interpretation = interpret(message.text);
console.log('InternChatBot heard: ', message.text);
console.log('InternChatBot interpretation: ', interpretation);
if (interpretation.guess && trainingData[interpretation.guess]) {
console.log('Found response');
speech.reply(message, trainingData[interpretation.guess].answer);
} else {
console.log('Couldn\'t match phrase')
speech.reply(message, 'Sorry, I\'m not sure what you mean');
}
}
```
Last up, let's bring it all together by calling all the functions we just created and the existing ones we have to get our bot up and running. Notice the code at the bottom is basically the same, except we've modified the `handleMessage` function to be a bit smarter this time around.
```javascript
// For each of the labels in our training data,
// train and generate the classifier
var i = 0;
Object.keys(trainingData).forEach((element, key) => {
trainClassifier(classifier, element, trainingData[element].questions);
i++;
if (i === Object.keys(trainingData).length) {
classifier.train();
const filePath = './classifier.json';
classifier.save(filePath, (err, classifier) => {
if (err) {
console.error(err);
}
console.log('Created a Classifier file in ', filePath);
});
}
});
// Configure the bot
// .* means match any message test
// The scopes we pass determine which kinds of messages we consider (in this case only direct message or mentions)
// handleMessage is the function that will run when the bot matches a message based on the text and scope criteria
Bot.hears('.*', scopes, handleMessage);
// Instantiate a chatbot using the previously defined template and API token
// Open a connection to Slack's real time API to start messaging
Bot.spawn({
token: token
}).startRTM();
```
### Taking it for a spin
Let's see what our bot can do! Go ahead and run `node index.js` in your console in the root of your project directory. If all goes to plan, you should see your bot injecting your training data examples and start up waiting for input.
Head back to Slack and try to ask it to introduce itself!

Ask it something else you trained it to respond to!

If you ask it something it hasn't been trained for, expect an appropriate response.

But you could always train the bot to respond to that by adding it to your training data! Just create a new label and add some questions and an answer you'd like the bot to respond with.
### Conclusion
I was going to write some extra stuff about how to deploy the bot somewhere and potential ideas for enhancements, but this post has already become longer than I anticipated. I plan to get those thoughts into a follow up post and link it here. In the meanwhile, please comment with your feedback. Was following along easy enough? What skill level are you at with Node development or ML concepts? Also don't forget to share the cool bots you create!
#### Other resources
Complete code example available here: [Nirespire/FAQBot](https://github.com/Nirespire/FAQBot)
Udacity Intro to Machine Learning: [intro-to-machine-learning--ud120](https://www.udacity.com/course/intro-to-machine-learning--ud120)
This article will teach you how to write your very own Slack chatbot that answers simple questions using some basic machine learning tools. Most of the more complex stuff around natural language processing and math behind creating machine learning models is mostly abstracted out, leaving room for us to easily build a finished product in a pretty short amount of time. If you're looking for a simple and effective way to get a semi-intelligent bot answering questions on Slack fast, then this guide is the one for you. If you want to skip to the finished code, check out the link to the Github repo here or at the end of the post. Edit 10/27/19 Because the library I used (Botkit) had a few critical security vulnerabilities and I couldn't get the latest version of the library working, I switched over to the Slack RTM API. The below code examples should work just fine, but if you're interested in using the latest version of the code, check out the example repo at the bottom. Link to Pull Request with all code changes. Some Setup This guide assumes you have basic knowledge about Node development, as this will be the main tool we will be using to build with. You're also going to need the following installed and working on your machine. I'm usually most productive in a unix-like terminal environment, aka bash. Here's what else you will need: An installation of NodeJS with the npm package manager. I used Node v10.1.0 with npm v6.1.0 when writing this, but any relatively recent version should work (like v6 and up). A Slack workspace that you have administrative rights in. If you can't find one, just make a new one. This is the playground where we will be developing and testing out bots capabilities. A code editor. I'm a big fan of VS Code. Once you have your Slack workspace open, go to any channel and click on the settings gear icon. We're going to add an app to our workspace. Search for bot and add the Bots integration. Add the configuration and give it a name you like. This will basically create a special type of user in your workspace you can send messages to, just like any other user. You can change the name and icon of the bot later, but what we need now is the API Token value that get's generated. BE SURE TO KEEP THIS VALUE SECRET. If someone gets access to this, they get free access to read and post messages in your workspace. Keep that value handy. We're going to use it soon as we start writing some code. Time to Code Basic bot setup To get something set up, let's start by getting some boilerplate code out of the way. The following npm commands should get the basics set up. # Starting in the directory where your code is going npm init -f npm i --save natural
[email protected] dotenv Notice the three libraries we will be using. natural: Provides basic text processing and classification functions botkit: A wrapper around the Slack API to easily write programs with integration with Slack dotenv: Let's us manage environment variables in a file for local development and testing From there we can start writing some code. Let's start by making sure we can connect to Slack using the API token we set up previously. Create a file named .env and paste in the following contents replacing the part after the = with your API token. SLACK_API_TOKEN= If you are using something like git to maintain your code changes, make sure to add .env to your .gitignore file so you don't accidentally push it somewhere others can see it! Next let's get to the real code. We're going to start with some simple setup to make sure we can connect to our Slack workspace using the API token and with some help from the botkit library. We can start with the an index.js file like this: const botkit = require('botkit') // Load our environment variables from the .env file require('dotenv').config(); // What are the types of chats we want to consider // In this case, we only care about chats that come directly to the bot const scopes = [ 'direct_mention', 'direct_message', 'mention' ]; // Get our Slack API token from the environment const token = process.env.SLACK_API_TOKEN; // Create a chatbot instance using Botkit const Bot = BotKit.slackbot({ debug: true, storage: undefined }); // Function to handle an incoming message // In this example function the bot will just reply with "got it" function handleMessage(speech, message) { console.log(speech, message); speech.reply(message, "got it"); } // Configure the bot // .* means match any message test // The scopes we pass determine which kinds of messages we consider (in this case only direct message or mentions) // handleMessage is the function that will run when the bot matches a message based on the text and scope criteria Bot.hears('.*', scopes, handleMessage); // Instantiate a chatbot using the previously defined template and API // Open a connection to Slack's real time API to start messaging Bot.spawn({ token: token }).startRTM(); The code above should be simple enough to get your bot up and running. You just need to execute node index.js, and your bot should connect to the Slack API and show up as "Active" in your workspace. If you send it a message, it should reply back with "got it". You could also modify the code to have the bot respond with whatever you like. Adding some machine learning Now that we have the basic setup done, we can start to add some intelligence to our bot. Since we're aiming to have our bot answer questions, we need to take a bit of an open ended approach. Not everyone asks questions the same way. So we need a way to match different questions or phrases coming in with what topic they're associated with, and then give the appropriate answer. Like I might ask: "What time is it?" while you might ask the same thing by typing "Give me the current time." Both phrases could be matched to the topic of "current-time," so we can't just use strict equality in our code. We are going to employ some machine learning to do this fuzzy matching. The first thing we need for this is a training data set with a pre-populated set of phrases, associated labels, and appropriate responses or answers. The training data format will be JSON that outlines some phrases and keywords that represent a type of question and a single answer that the bot should respond with when it sees a question like those phrases or keywords. For example, here's a training data set with only two topics, each with a set of possible phrases, and an appropriate response: { "self": { "questions": [ "introduce yourself", "sup", "hi", "hello" ], "answer": "Hello! I'm a chatbot tasked with answering your questions! `Beep, Boop` :robot_face:" }, "world": { "questions": [ "what is the world", "answer to the universe and everything" ], "answer": "42" } } Put this in a file called trainingData.json in the root of your project. Each group of questions and answer has a label. This is how our bot will try to classify all the input it receives and figure out how to respond. Now let's add some code to consume the data and train a classifier we can later use to intelligently match and respond to questions. We can create a simple function to read our trainingData.json file and convert it into a JavaScript object we can read from. /** * Function to easily parse a given json file to a JavaScript Object * * @param {String} filePath * @returns {Object} Object parsed from json file provided */ function parseTrainingData(filePath) { const trainingFile = fs.readFileSync(filePath); return JSON.parse(trainingFile); } Then we can load our training data using the function like so. // Load our training data const trainingData = parseTrainingData('./trainingData.json'); Next up is creating what's called a classifier to consume our training data and create a machine learning model to later make decisions to incoming questions based on what it has learned. Basically, given the set of phrases and responses we provide, the model should be able to extrapolate what response to provide to a phrase it sees as similar to one it has seen before. If you want to learn more about what exactly a classifier is in the context of machine learning, check this out. We're going to use a library for this. So start by importing the natural library we installed earlier and create a new LogisticRegressionClassifier at the top of you file. const NLP = require('natural'); // Create a new classifier to train const classifier = new NLP.LogisticRegressionClassifier(); Next we need a function for the classifier to be able to ingest training examples. In this case: what questions (phrases) match up to a given answer type (label). /** * Will add the phrases to the provided classifier under the given label. * * @param {Object} classifier * @param {String} label * @param {Array.String} phrases */ function trainClassifier(classifier, label, phrases) { console.log('Teaching set', label, phrases); phrases.forEach((phrase) => { console.log(`Teaching single ${label}: ${phrase}`); classifier.addDocument(phrase.toLowerCase(), label); }); } Now that we have a way for our bot to learn some examples of phrases it might see and classify them appropriately, we need a way for it to handle sending back a proper reply. Since our training data includes an answer for a set of example phrases under a label, we can use it to have the bot send back the same reply. So if our chatbot sees an incoming message that looks like "sup", based on our training data, it should classify it with the label "self" and send back the answer associated with that label: "Hello! I'm a chatbot tasked with answering your questions! Beep, Boop :robot_face:". Look back at trainingData.json if you need to see that example again. One thing it considers is the fact that our classifier's guesses will usually not be perfect. Each guess will have a different confidence value associated with it corresponding to how confident the classifier is to matching a label to the phrase provided. As a result, we need to put in some logic to only give a response if the classifier is pretty certain it has the right guess of how to label the input phrase. If not, we basically respond with "¯_(ツ)_/¯ don't know what you're talking about. I'm not trained to respond to that." That's a lot of explaining, let's see what our function to interpret incoming text looks like. /** * Uses the trained classifier to give a prediction of what * labels the provided pharse belongs to with a confidence * value associated with each and a a guess of what the actual * label should be based on the minConfidence threshold. * * @param {String} phrase * * @returns {Object} */ function interpret(phrase) { console.log('interpret', phrase); const guesses = classifier.getClassifications(phrase.toLowerCase()); console.log('guesses', guesses); const guess = guesses.reduce((x, y) => x && x.value > y.value ? x : y); return { probabilities: guesses, guess: guess.value > (0.7) ? guess.label : null }; } Notice where we check if guess.value > 0.7. What this says is that if our classifier does not match a label with a confidence of at least 70%, then we say we didn't find a match. Whatever message came in didn't match anything we trained our classifier to respond to, so we return null and our ¯_(ツ)_/¯ response. This is like if someone asked you "What time is it?" you know exactly how to respond because you learned what that question means and how to get the answer. If someone game up and said "Blargen Flostel Bhigba" chances are you never learned how to respond to that, so you'll probably throw up a ¯_(ツ)_/¯. So now we need a function to match up that label with the answer that corresponds to that label. Let's modify our handleMessage function to do this. Instead of sending back the same reply to everything, let's interpret what the message was, then use the label our classifier generates to provide the appropriate answer based on our training data. If our attempt to interpret the message didn't yield a result, the bot can simply reply that it didn't understand. /** * Callback function for BotKit to call. Provided are the speech * object to reply and the message that was provided as input. * Function will take the input message, attempt to label it * using the trained classifier, and return the corresponding * answer from the training data set. If no label can be matched * with the set confidence interval, it will respond back saying * the message was not able to be understood. * * @param {Object} speech * @param {Object} message */ function handleMessage(speech, message) { const interpretation = interpret(message.text); console.log('InternChatBot heard: ', message.text); console.log('InternChatBot interpretation: ', interpretation); if (interpretation.guess && trainingData[interpretation.guess]) { console.log('Found response'); speech.reply(message, trainingData[interpretation.guess].answer); } else { console.log('Couldn\'t match phrase') speech.reply(message, 'Sorry, I\'m not sure what you mean'); } } Last up, let's bring it all together by calling all the functions we just created and the existing ones we have to get our bot up and running. Notice the code at the bottom is basically the same, except we've modified the handleMessage function to be a bit smarter this time around. // For each of the labels in our training data, // train and generate the classifier var i = 0; Object.keys(trainingData).forEach((element, key) => { trainClassifier(classifier, element, trainingData[element].questions); i++; if (i === Object.keys(trainingData).length) { classifier.train(); const filePath = './classifier.json'; classifier.save(filePath, (err, classifier) => { if (err) { console.error(err); } console.log('Created a Classifier file in ', filePath); }); } }); // Configure the bot // .* means match any message test // The scopes we pass determine which kinds of messages we consider (in this case only direct message or mentions) // handleMessage is the function that will run when the bot matches a message based on the text and scope criteria Bot.hears('.*', scopes, handleMessage); // Instantiate a chatbot using the previously defined template and API token // Open a connection to Slack's real time API to start messaging Bot.spawn({ token: token }).startRTM(); Taking it for a spin Let's see what our bot can do! Go ahead and run node index.js in your console in the root of your project directory. If all goes to plan, you should see your bot injecting your training data examples and start up waiting for input. Head back to Slack and try to ask it to introduce itself! Ask it something else you trained it to respond to! If you ask it something it hasn't been trained for, expect an appropriate response. But you could always train the bot to respond to that by adding it to your training data! Just create a new label and add some questions and an answer you'd like the bot to respond with. Conclusion I was going to write some extra stuff about how to deploy the bot somewhere and potential ideas for enhancements, but this post has already become longer than I anticipated. I plan to get those thoughts into a follow up post and link it here. In the meanwhile, please comment with your feedback. Was following along easy enough? What skill level are you at with Node development or ML concepts? Also don't forget to share the cool bots you create! Other resources Complete code example available here: Nirespire/FAQBot Udacity Intro to Machine Learning: intro-to-machine-learning--ud120